Sunday 16 December 2018

What I have Been Doing This December with Beautiful Baubles.

I have been making lots with Beautiful Baubles stamp set, some from chance and others by design.
These first two cards were by design, in that I knew what I was going to do before I started. I was going to make a stamped bauble background and layer up a couple of baubles (one die cut) in the other card, and I was going to colour using blenders. The card on the left used the 'spotlight' technique. I stamped out the bauble to make a background with Versa Mark ink and then silver embossed it. While I did that I stamped out some extra baubles and embossed those as well. I then coloured one of the baubles and the extra baubles using blenders. The colour combination on the left used Light Sea Foam, Highland Heather, Pear Pizzazz. The bauble on the right was coloured with Light Pear Pizzazz, Night of Navy, Bermuda Bay and Pool Party.

I did say I stamped out extra baubles (as in the second card) and coloured them.  When I was tidying my table I went to put the left over baubles in a box which I keep on my table for leftover bits and pieces. I started sorting through the things which were in this box as it was starting to overflow and that's when the next couple of cards evolved.
I found some bokeh background panels which I thought would team well with baubles.  I had gone crazy a while back with the bokeh technique.  If you are not sure what that is, here's a quick explanation - sponge 2-3 colours on a piece of Whisper White cardstock, then take a circle stencil and sponge a variety of circles sizes, some overlapping with Craft Ink.
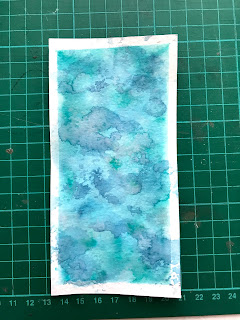


Not only did I find those unused Bokeh backgrounds I also found this 'smooshed' watercolour piece. It wasn't difficult working out what to do with it - just take a look at the card on the right. I teamed the smooched paper with some Sparkling Glimmer paper to make two beautiful baubles.
I also had the flurry of snowflakes sitting on my desk waiting to be used. I had collected this die cut from an evening at Sue Madox's (my upline demonstrator). I was going to make something with it but I had drawn a blank. But while I was making the smooshed bauble card, a lightbulb went off in my head - of course, the perfect background for a snowflake flurry. And so that's how the card on the left evolved.


Saturday 15 December 2018

December Card Class and News on 2019 Classes

This is what we made in our December card class.  We found during the year that making three cards in a session was too rushed and left little time for  exploring card techniques. 
It seems that's what we want to do most in class are techniques! This is what I enjoy too and can't wait to start! 
So taking all that into account I have made a few changes. Firstly, I am reducing the number of cards made in class from 3 to 2.  This will allow for time to learn a technique which then can be added into a Class Technique Book. 
I will have weekly classes scheduled in January and February on a Wednesday and a monthly class on a Friday to begin with. 
All classes run for two hours now with a $20 charge (down from $25).  Also, you will required to bring your own essential tools (eg. scissors, paper piercer, etc) and anything that sticks (all adhesives, dimensionals, rhinestones and pearls).
I am continuing with the complimentary class with any order for over $30 including p/h. A great way of earning free classes! Free classes must be taken within the four weeks following the order date or by negotiation.


Friday 16 November 2018

November Card Class Cards

 If you wasn't at my November card class, this is what you missed, plus your choice from one of the gorgeous cards from the Timeless Tidings Kit!
Hope to see you in my next class, and can you believe it the last class for the year on 5th December!

Monday 12 November 2018

Make More Cards with Your Timeless Tiding Kit.

I am a fan of YouTube and I was viewing  a video by Rachel Tessman where she made double the cards by cutting up some of the cards from the kit. I thought that it was a wonderful idea and I thought I would give it a go! My card kit class was coming up so I challenged myself to make some  alternatives to share.  Rachel also had some tips with how to use up the scraps from the gold foil.  She used some kind of plastic wrap which came on a roll which she used to pick up the tiny leftover pieces from the edgings to make another edging. So I tried it with Sellotape and it worked just as well. If you are not following me now it will become clearer with my card examples which follow.
Here's my take on making some alternative designs and some tips to help you with yours.

   The card on the left is the original card kit design and my card is on the right.  I used some discontinued (Always Artichoke) cardstock but Old Olive or Pear Pizzazz would work just as well!  I left off the flagged sentiment and did all my stamping on the inside.
Notice the difference with the gold foil border on the side of the holly?
I used what was left after peeling the border (for the first card) from the foil sheet.  I picked the leftovers up with Sellotape and made it into a new border.  It adhered down and peeled away without any problems. Just had my paper-piercing tool ready to help stick down any stray pieces.


Again the top card is from the kit and I made two cards by cutting the decorative panel in two.
For both of my cards I added a versa mark and gold embossed tree.  The tree stamp is from the Timeless Tiding stamp set.
I mounted the tree piece onto a scrap of Tranquil Tide cardstock and adhered it to a thick Very Vanilla cardbase.  I gold embossed the sentiment from the Merry Christmas to All stamp set.
The second card was mounted on a panel cut from another card kit card base and trimmed with Tranquil Tide Velvet ribbon. The tree panel was mounted on a black section of card base cut from another card base from the kit and trimmed with some gold leftover border trim.
Both cards were finished with some bling! I coloured some rhinestones with a Dark Mango Melody Blender. Almost looked the same as the gold coloured rhinestones provided.

Moving onto the third card from the kit which is the top left card. I made two cards by cutting the decorative piece in two.
The portrait card was made using a section I cut a section from another cardbase (diagonal stripe) provided and adhered it to an Always Artichoke cardbase. I stamped the sentiment from the co-ordinating stamp set onto some Whisper White cardstock. I also stamped the rings around it from an old stamp set Cheers to the New Year. The band of ribbon and bow used the Merry Merlot & Copper Ribbon.
The landscape card used a section cut from one of the provided cardbases, adhered to a Always Artichoke card base. The gold trim was a side piece leftover from one of the stickers sheet.


The last card is very similar to the original.  Again I used the scrap from the first card border trim to border the decorative panel. What you can't see is that the front of the card is sitting on a Whisper White cardbase as I used the back of it (diagonal stripe card base) to make a decorative paper in another card. Also the gold trim on the Merry Christmas sentiment stripe used the edge of a scrap of leftover foil trim. 


Hope you got some ideas, tips or inspiration from this post. I haven't counted up the number of cards I have made with this kit, but it is quite a few more than expected and  I still have some pieces leftover which could still be made into more cards!

Sunday 11 November 2018

Dashing Dear Silhouette Card with Bronze Embossed Edging.

I simply love this stamp set (Dashing Dear), I really should say I love the dear thinlit from this bundle.  I also have gone mad using Bronze foil with the Joyeous Noel Speciality DSP, so much so that I had none left to use on this card.  After the dear was cut from the Whisper White cardstock, I dragged it through my Versa Mark stamp pad and dipped the edges in bronze embossing powder. It gave a touch of bronze to the edges.  If I was to do this again I think that I would tilt the Whisper White paper more when dragging it through the Versa Mark pad to give a wider border
.

Monday 29 October 2018

Three Cards, One Layout Using Merry Christmas To All Bundle with Joyeous Noel Speciality DSP.

Very little stamping with these cards. No need with such beautiful designer papers! The 'merry' sentiment and flourish was stamped with co-ordinating ink from the paper.  The 'Christmas' was cut with a thinlit using Copper Foil. 

Friday 26 October 2018

Beautiful Day - Watercolour Butterfly

Today's card uses the butterfly from the Beautiful Day stamp set. On my last blog post I stamped it with Versa Mark ink and white embossed it on vellum, I did the same with today's card but swapped the vellum for water colour paper. The sections on the butterfly's wing was simply coloured using Coastal Cabana (light sections) and Bermuda Bay (darker sections) with my Aqua Painter filled with water. I washed around the butterfly with very diluted Coastal Cabana ink. I trimmed the paper down and mounted on some Silver foil paper and  adhered it to a Coastal Cabana card base.  I used the small birthday sentiment from Happy Birthday Gorgeous in Bermuda Bay. The ribbon is some from my stash in Bermuda Bay.

Monday 22 October 2018

Beautiful Day Butterfly - Stained Glass Technique

I stamped 3 Butterflies onto vellum with Versa Mark ink and embossed with silver embossing powder.  I coloured each using my Stampin' Blends.  I didn't turn the vellum over to colour as I wanted the colour to stay as vibrant as it could.  With each butterfly I restricted to using two colours, choosing light and dark for variation.

Friday 12 October 2018

Colouring Using Stampin' Blends (2)

Today's two cards features more colouring using the same dsp from earlier in the week.  Monday's cards only had the background of the dsp coloured and today's cards were completely coloured in - no white spots.  This paper was so easy to colour as the design had the highlights already marked in shades of grey. When I colour with Blends I always have some scrap paper below to soak up any excess ink. This helps stop bleeding over the lines in unwanted spots. I usually start with the light shade, add the contrast with the dark shade and go over this and blend with the light shade blend. When I refer to contrast, I mean what's in shadow. This is usually where the petals overlap or the leaves touch. Alternatively, if you are unsure pretend that you are shining a torch down and work out what would be in shadow.
Hope you like my colouring and layouts.

Monday 8 October 2018

Simple Colouring using Stampin' Blends (1).

I have three cards to share.  I do love colouring. I find it so relaxing and enjoyable.  What was even more satisfying is that I have no more of these sheets to colour.  This is a good thing - right! I don't want to be hoarding paper!
For these cards I simple coloured the backgrounds. The first card background used light Sea Foam, the second light Smoky Slate and the third light Highland Heather. 


Before assembling these cards I did some more colouring with my blends, colouring the whole pieces.  I share these with you on Friday.

Saturday 6 October 2018

Happy World Card Making Day

Here's my card that I made to celebrate this special day. It features one of my favourite new colours - Mint Macraron. You saw a glimpse of it in my post from yesterday. I used the Petal Palette stamp set and co-ordinating Petals and More Thinlits.  I also used an embossing folder from the Petal Pair Textured Impressions Embossing Folders.  The oval was cut using the Stitched Shapes Framelits.  This set is one of my most used framelits sets.  I used some DSP from the Subtles 6x6" stack.  A piece of the gorgeous new Tranquil Tide Velvet ribbon was folded and tied with some white Bakers Twine.

Friday 5 October 2018

World Card Making Day


Tomorrow is the special day for card makers around the world, but you can celebrate a few days longer with Stampin' Up!  You have the week-end as well to check out a select list of discounted products to set you making cards not just on one special day but for many more days to come!  Stock up on some essentials or do some early Christmas shopping for your crafty friends. 

Here are three cards that I made from some of Stampin' Up! list of selected products.  The top two are from kits (Soft Sayings Card Kit and the Lots of Happy Card Kit) and the bottom card uses the Petal Palette stamp set. Pop over to my online shop and check out the whole list of wonderful product. Have fun tomorrow celebrating  World Card Making Day!


Monday 1 October 2018

Adding Colour to Graceful Glass Designer Vellum

A few thoughts went through my head before I began - should I use markers or blends, and which side should I colour on?
I tried both.  I found that for me there was little difference with straight colouring using either blends or markers.  Blending light and dark colours for shading was challenging. I tried blending with both markers and blends.  You could blend the markers provided the ink was wet and in small areas. Really I just wriggled my marker, darker over light, so that it wasn't a solid line.  I am referring to the purple flowers which you may not even notice the shading as it is such a small area. I tried blending shades with my blenders.  I had some success with the pink flowers but ended up with a little wet mess trying to shade around the outside of the flowers.  This led me to think that plain colouring looks just as good. 
I coloured on the printed side of vellum.  The print is a little raised, so colouring inside was easier.  If you turn it over to colour, the colour is duller or muted and it is harder to stay inside the lines.  I double matted both of the pieces to bring out the colours. The stained window was matted on whisper white cardstock and the bookmark was adhered with glue dots  on a matching purple shade, before mounting onto black cardstock. 
If you didn't work it out, I used markers on the bookmark and blenders on the card.

Christmas Card made using the Tag Punch


Back in August I made a tag punch card for my daughter Stephanie's birthday.  She loved the colour combination of the pinks and coral colours with gold. The paper was from the Painted with Love Speciality DSP.  I had a lot of fun making this card and thought I would make a similar card using a sheet from the Joyeous Noel Speciality DSP.  I absoloutely love this set of papers!    The Christmas Greeting comes from the Timeless Tiding Stamp set.  The greeting was stamped in Versa Mark and embossed with copper to tone in with the paper.  I also punched the tag behind the greeting with  copper foil. It was cut in half to edge the greeting. It was finished with copper thread and the gorgeous new Tranquil Tide Velvet Ribbon.

Friday 28 September 2018

Card Class News


Just a reminder that there are no card classes in October.  November will be a busy card making month with the card class  as usual plus the special Timeless Tide Kit Class on Friday 9th November.
Remember to book your place before the 21st. October to allow for sufficient delivery of kits. The only charge for this class is the price of the kit ($35).  I supply the stamp set, inks and adhesives. At the end of the class you get to take home 20 beautiful Christmas cards.


Love to see you in class in my other card making classes.  Below are the cards made in the past two classes.


Thursday 13 September 2018

A Stylish Quick Easy Card using the Foiled-Edged Cards & Envelopes Set

This card took simply no time at all to make.  I embossed a piece of Whisper White cardstock using the new Swirls & Curls Textured Impressions Embossing Folder.  Cut out a silver foil deer using the a thinlit from the Dasing Deer Dies set.  Silver embossed a sentiment from the matching stamp set on a strip of Whisper White cardstock. Flagged one end and stuck some rhinestones to the other end.

For this card I used one of the foiled edged card and matching envelope in silver.  Packs of 20 cards and envelopes, either in silver or gold foil  can be found in the new Holiday catalogue.


Ho! Ho! Ho! Who Needs Snow

Finally, a Santa for our sunny shores! I just had to get this set.  I coloured him using my Stampin' Blends but inks with a Blender Pen or our Watercolour Pencils could be used as well.
The Card uses Blueberry Bushel cardstock and paper from the In Colour 6x6" DSP stack.  The embossed background used the Seaside embossing folder.

Card Inspired from the Timeless Tidings Kit and Stamp Set

 I loved making the cards in the Timeless Tidings Project Kit but I didn't want to stop there! Those cards in the set gave me inspiration to keep making. 
Here's my favourite from my efforts.  To make this card more of my own, I used the spotlight technique.  Using the tree from the set, I stamped multiple times with Tranquil Tide ink onto watercolour paper and washed using an aqua painter. Making sure that it had dried, I then stamped over one of the trees with Versa Mark Ink and embossed it in gold. 
Below are some more cards using the stamp set and new product from the Holiday catalogue.  Love the new Joyous Noel Speciality DSP and the Merry Merlot &Copper Ribbon. 


Thursday 6 September 2018

Special Card Class using Timeless Tidings Project Kit

Love this special project kit. It would help any card maker get on top of  Christmas card making.  The kit makes up 20 cards with four gorgeous designs.  Look at the lovely envelopes trimmed in gold! 
The kit contains everything except inks, adhesives and the stamp set.  This is where I come in. I will supply all of the extra things that you need to complete these gorgeous cards in my special class on Friday 9th November beginning at 10.30am for the cost of the kit only ($35).  Bookings taken up to 21st October to allow sufficient delivery of orders.  Purchase the kit from my online shop or when booking arrange payment of kit with me.


Thursday 31 May 2018

DSP Delight (3) - Share What You Love Speciality DSP

I am sorry that I couldn't post earlier but I was laid low with a bad cold. Anyway, I will take up my challenge from today with presenting some more DSP Delights! It features another gorgeous sheet from the Share What You Love Speciality DSP (146344). 
From one sheet of speciality paper I made 8 cards. The last of those cards was a Z Fold card.
See the pattern below, but basically, one 1" inch
strip was cut off and reserved for the Z Fold Card, and the remainder was cut to make 6 pieces measuring 4x5 1/2". Then some of those panels were cut again.


I hope you like them!

I also used -
 Decorative Ribbon Border (141491)
Layering Oval Framelits (141706)
Paper Doilies
Tailored Tag (145667)
Ribbon - Black, white, Grapefruit Grove
Cardstock - Black, Sahara Sand, Tranquil Tide,                            Mint Macaron
Stamp Sets - Love What You DO
                     Beautiful You
                     Beautiful Bouquet
Embossing Folder - Lovely Floral


DSP Delight (2) - The Napkin Fold Gift Box And More!

Well this is my second week of my challenge, to take a sheet of dsp and use the whole sheet.


I made a lovely gift box and three cards from my favourite sheet from the new Share What You Love Speciality DSP.

I saw a fun little box on YouTube by The Paper Pixie and thought I would give it a go! I am usually challenged when it comes to 3-D projects but it looked fun. It appears complicated but it wasn’t!
Remove the lid and see the decorative napkin fold. Open it out and see that even the inside is
as pretty as the outside.


DSP Delight (1)

I love my DSP (Decorative Speciality Papers) and I have been guilty, in the past, of keeping some sheets because it was too lovely to cut into, or I was keeping it for the 'right' project, or because I wasn't sure what to do with it!
 All of those reasons were absurd! It should be used and appreciated.

So I plan each week to take a DSP sheet from my shelf and use it!
Here is what I made with a sheet from the Sweet Soiree Suite.


So I decided I would do a One Sheet Wonder - my own design.  I wanted to make some cards that would show off the paper and a gift bag. I took one 12x12" sheet and cut it in half. One half for a gift bag and the remaining half made four cards. The cards were cut according to my pattern.


Here's the first. The dsp was  layered on Silver Foil.
Love the simple bow and band of ribbon of Pear Pizzazz ribbon on Wild Wasabi strip of cardstock (which was the same as the cardbase).I left off any sentiment so that it could be used for any ocassion.


A birthday card was next.  The birthday sentiment is from the Beautiful Bouquet stamp set was stamped on white cardstock and cut using a circle from the Stitched Shapes Framelits.  It was bordered with a Delicate White Doily.  A Pear Pizazz bow with some Enamel Shapes finished the adornments.  The slither silver foil strip was attached to the strip of dsp on a Marina Mist cardbase.


The next two cards featured two panels of dsp.  I strategically cut away pieces to make the uneven edges.  I do love to fussy cut.


The sentiment came from the Soft Sayings card kit. Berry Burst Metallic-Edge Ribbon strip and bow border on Marina Mist cardbase finished the card.


 I made this card using a Z-Fold using a thick Whisper White cardbase. I attached the dsp to the front and bordered it with silver foil and Pink Pirouette ribbon and bow.  Also a piece of Pink Pirouette card piece was adhered to the inside, allowing for a small white border to show.  The birthday sentiment inside the card was from Better Together stamp set and embossed with Silver Embossing. It can be seen in the group photo above.


I used the Gift Bag Punch Board to make this bag.  The tag from cut using the Sweet Cake Framelits Die and was stamped using stamps from the Cake Soiree stamp set.