Monday, 4 March 2019

2. Brusho's and Beautiful Day


Yes I am quite pleased with how they turned out.
You can compare with the photo below.
The top card used only the flower. I didn't like the blue mess. I fussy cut around the flower.


I used the Subtles 6x6" DSPaper on both cards co-ordinating with the So Saffron and Pear Pizzazz card bases. The sentiment from the top card came from Enjoy Life Stamp set and the bottom used Varied Vases. A little piece of Pear Pizzazz trimmed the bottom card. The ribbon is no longer available but a strip of Pear Pizzazz cardstock would do the trick.


Friday, 1 March 2019

Brusho's

Brusho's have been around for quite awhile now.  If you don't know Stampin' Up! released a set of 5 colours.  They are water colour ink crystals which when mixed with water makes washes and designs.  There are 5 colours in the pack and they are Brilliant Red, Gambage (orange), Moss Green, Prussian Blue and Yellow. I have to confess I purchased these last year and they sat on my shelf. I decided to get them out and have ago after my daughter Hannah remarked, "How have you not used them yet!"

Hmm, well  Brusho's looked fun but you have little control over the final results (the crystals burst with colour when wet) and this is what stopped me I think.  Yes, you can make lots of unique backgrounds but you can do more too. So with caution I started. I think the best advice I can give
(if your a control freak) is to start with just a few specks whether you are adding to a wet or dry water colour paper or pallet. Of course, I didn't adhere to that advise strictly speaking with my first play after all you do need to see what the crystals can do!
After my initial play I became more conservative.
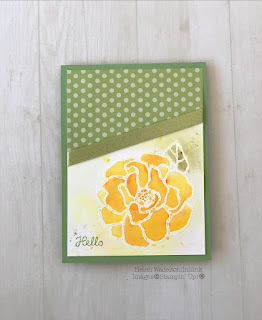
I stamped the flower and butterfly from the Beautiful Day stamped set with Versa Mark and embossed with white embossing powder. I then taped each down to a board ( to stop warping) and then spritzed the paper with water before tipping the crystals (Brusho's) onto the water colour paper.
Oh, the other best advice I forgot to say earlier was not to remove the lids but to pierce the lids with a drawing pin (to stop excessive crystals escaping - need only a few sprinkles). Store with the pin in the lid.
Well here's what I finished with. One I was very conservative with, the other not so. I didn't sprinkle madly, I did try to put , for example the yellow and orange inside the flower and green on the leaf.
I made 4 cards that I quite liked. Initially I thought some were going to end in the bin, but they survived! I shall share these with you over my coming posts.


Monday, 25 February 2019

Double Layer Butterfly Card

This was going to be a triple layered card but I would have lost the design so it only made it to two layers!
When I got this DSP pack I was determined that I was going to use it. Hope you are not getting sick of seeing it. Honestly, how could you! The paper is so versatile, so much to do with it!

Friday, 22 February 2019

Inside Banner Pop-Up Card

This card was inspired by a card I saw on Pinterest by Lynn Dunn. She called it a 3D Pop Up Butterfly Card, but I have seen similiar cards referred to as Inside Banner Pop-Up so that is what I am going with.  I did make some changes. I changed the front layout, different Botanical Butterfly DSP and I used Enjoy Life stamp set images and sentiments. So I think it has enough 'me' in it. I love it!
Hope you like it!


Monday, 18 February 2019

3. Colouring Wonderful Romance

This is the last in my series of colouring the bouquet from the Wonderful Romance stamp set. My colouring this time used Stampin' Blends (Alcohol Markers) onto Shimmery White cardstock with Memento Black ink.  I find colouring with blends and watercolour pencils to be similiar but each has there own pecularities.
The blends have a light and dark pen. So the darker colour is coloured where you want it darker, like in shadows. The lighter colour is coloured where you want highlights, for example the tips of the leaves. I know that's simplified but hey that easiest and shortest way of explaning it.


Again I find when blending the colours or shades together I colour in circles.
You can blend different colours together. For instance the yellow flowers were coloured with Daffodil Yellow and Mango Melody. I added a line of Mango Melody to the tops of the petals, coloured up and down to blend with yellow.
It's best to sit down and make a swatch of the colours and samples of the colours that blend well together for future reference.


I like to use Shimmery White cardstock with my blends.  Stamp your images with Memento black and make sure that the ink has fully dried before colouring. Always have some scrap paper below to soak up some of the excess ink when blending. I prefer it to soak into the scrap rather than bleed on the surface.


Hope you liked this colouring series and that you join the colouring craze too. I find it relaxing and stimulating at the same time.
I am self taught and my skills have grown with practise.
My best advise when it comes to colouring is to have a go, and practise. I tried to keep it simple so that you have a go. It is a beginning which can be built on. Don't expect a masterpiece first off, practise, watch some  Youtube tutorials or come to one of my classes.


Thursday, 14 February 2019

The Romance Continues.

Happy St Valentines to everyone!
Today's cards are for this special day.  I have used the Wonderful Romance Bundle with the Floral Romance Speciality DSP. No colouring with these cards, just some simple stamping. 


This card uses two vellum sheets from the Speciality DSP. One for the background, while I fussy cut some flowers and leaves from the other.


This is my favourite, I love the white, grey and pink palette. I layered up some leaves and finished it with a white Bakers Twine bow. This was adhered to the decorative label and raised up with some dimensionals. Below it is a white ribbon banner.

Monday, 11 February 2019

2. Colouring Wonderful Romance


I water coloured with inks onto water colour paper with an Aqua Painter in my last post. Today I am using the same stamped which has been stamped with Versa Mark ink and silver embossed onto Shimmery White cardstock, water colour pencils with a Blender Pen.
Shimmery White cardstock is a good choice to use with an Aqua Painter or with a Bender Pen.
If I was colouring in a large page of a colouring book I would on most occasions reach for my Aqua Painter. For a small stamped image I would prefer to use my Blender Pen. I used my Blender Pen on these two cards.
Again I am self taught with colouring with Water Colour Pencils.  So this is my interpretation on how to use them.


When I got my pencils I made a colour swatch, and I played around with finding colours that blended well together and kept this with my pencils. This can be added to as you go along. I won't bore you with a long explanation of how I coloured this image but take the flower in the bouquet for an example,  the bottom of the Petals were coloured with Daffodil Yellow while the top portion of the petal was coloured with Real Red.  Then using the Blender Pen I started to colour up in circles up to the Real Red, mixing or blending it together and then coming down in circles. Hope you can follow that explanation.


The leaves I coloured in the same fashion but I wanted to add some light/dark and shadow into them. I used Old Olive at the base of each leaf and under or around leaves that were on top and Yellow Daffodil to the tips of each leaf. Not all of the leaf had colour layed down, in other words some areas of the leaf were not coloured. Again I used my Blender Pen and colouring in circles, moving the colour to white areas and up to the yellow tips, then working down again.