Saturday, 20 February 2016

Botanical Gardens Mint Birthday Cards.

I was needing a birthday card and remembered seeing a card by Emma Goddard on Pinterest that I liked and wanted to make. I set about copying the colour scheme and layout using white and Mint Macaron and a sheet of designer paper from the Botanicals Gardens DSP.  The flowers were cut using the Botanical Builders Framelits.  Then I made my own card using the same colour scheme but with a different card fold. Here are the two cards, my design is on the left.


I will run through how I made Emma's card and why I changed it up.


The card uses a portrait style Mint Macron card base.I found cutting the leaf border a little tricky but not difficult. I kept reversing it and ending up with a narrow piece of card instead of the wider white panel, but I will remember this for future use. A 2" strip of DSP was adhered to show off the border, unfortunately I adhered my flowers too far to the right and missed out on the full effect. The second flower was cut from Whisper White cardstock and sponged with Mint Macaron. I used small rhinestones in the mint flowers and the middle sized rhinestones on the sponged flowers. The sentiment came from a Hostess set - Because You Care.

I had a few leftover flowers, and as I really loved them, I thought I would make use of them in another card. I used a Whisper White landscape card base. I cut a 1 1/2" panel from the front of the card and adhered a 2" stripe of DSP to the inside (top) which became the front view of the card.  Arranged my flowers to the top front panel and stamped my birthday sentiment from another Hostess set - Happy Birthday, Everyone.  A real quick and easy card.


Friday, 19 February 2016

Gorgeous Grunge


This stamp set has been out for awhile now, and makes  background stamping easy without any fuss. A must have, no more torture with trying to get it just right - or not right!  'Perfect Imperfections for All Occassions' would be another great name for this stamp set!


Again I went to Pinterest for inspiration and found this great simple and quick card from D. Daisy at Splitcoast Stampers. I used Whisper White, Night of Navy card, some Silver Glimmer paper, and Night of Navy and Smoky Slate inks. The sentiment came 'Number of Years' stamp set.


The next card is a variation of a card from Mary Brown found on Pinterest.   I used Rich Razzlebury, Whisper card, paper from the Moonlight Designer Series Paper Stack, Silver Glimmer paper and Rich Razzleberry and Crushed Curry inks. The sentiment came from 'Endless Birthday Wishes' and completed with some rhinestones.
The oval was cut using the oval framelits and decorated with Paper Piercing.


The last two cards were of a variation from a card found on 'Scrappin' and Stampin' in GJ'. The original was a one layer card. I used the same colour scheme and layout in my card on the left. I did add my own touches to both cards.


The card base used Lost Lagoon cardstock. Two of the corners of the Whisper White card were punched using the 'Corner Curvy Trio Punch and the remaining two corners were punched using the 'Project Life Corner' punch. Lost Lagoon and Old Olive inks were used. The sentiment in black from 'Sky is the Limit' stamp set.
The butterfly was cut using the Butterflies Thinlits in Lost Lagoon. The body was decorated with rhinestones.
The ribbon is a stamped piece of Crumb Cake cardstock.


In the last card I used Melon Mambo and Daffodil Delight inks and cardstock. The wings of the butterfly were brushed with the Clear Wink of Stella. Rhinestones, sequins from the Metallics Sequin Assortment  and Dazzling Details completed the bling on the card.  The sentiment came from the Number of Years stamp set.  I did have a little girl in mind when makiing this card.  

Thursday, 11 February 2016

Love Selection

 Saint Valentines Day is nearly with us and I have my love selection to  share with you.  The first three cards could also be used as Wedding or Engagement cards as I left off any sentiment.

Monday, 8 February 2016

Love Hearts on Watercolour Background


This is the last of the three cards I made with the watercolour and the rock salt technique and my favourite.  It's my favourite as the colours are so vibrant and this card is so very different from what I usually make.

I stamped three hearts using Versa Mark ink onto vellum and embossed with black embossing powder.  I fussy cut around the hearts and attached them by stampling them onto the water colour paper which had also been fussy cut. the watercolour paper was attached with dimensionals to the black card base. I attached a Whisper White sheet inside to write on.


Built for Free Using: My Stampin Blog

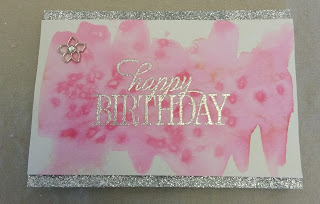
Happy Birthday - Watercolour Background


This was the second card made from one of my watercolour pieces using the rock salt technique.
A border of silver glitter was attached top and bottom to the Whisper White cardbase. Happy birthday was stamped and embossed with silver glitter and completed with a flower medallion onto the watercolour piece of paper . It was attached to the cardbase with dimensionals.


Built for Free Using: My Stampin Blog

Bloomin' Hearts - Watercolour


The heart and flowers were cut from a piece of watercolour paper that I had coloured using the rock salt technique
hence the variation of colour (see previous post).


Built for Free Using: My Stampin Blog

Watercolour and Rocksalt

 At the weekend I played around with applying ink to watercolour paper and while wet scattering it with rocksalt.  The rocksalt draws the ink to it and you get some interesting results.
This technique is easy - wet some watercolour paper using a paintbrush or aquapainter. Dip your brush into a small amount of ink and apply to the wet patch on the watercolour paper. Then sprinkle with rocksalt. Leave to dry and then brush off the salt.
I used Melon Mambo ink and these three cards were the end results of my efforts.


Tuesday, 2 February 2016

Botanical Blooms (4)


I wanted to make a card using a panel of my own
Designer Specialty  Paper.  My intentions was to make it bright but different from the paper pack on offer from the catalogue.The panel measured 2 3/4" and mounted on a 3" piece.
Two of the leaves and two of the flowers were stamped randomly with the tiny flowers stamp filling in the white spaces.  The larger flowers had their centres stamped and the leaves had their veins stamped with their corresponding stamps. Tone on tone ink was used. The stamped flowers were completed with a rhinestone and Dazzling Details were applied to the tiny flowers.  The card base was also stamped with the tiny flowers stamp. Again tone on tone was used.

The large flower and one each of the leaves were cut using the matching framelits. The cut out leaves were also stamped with the corresponding leaf vein.  The large flower petals edges were sponged and completed with a flower medallion.
A sentiment to the left corner could have been included.  I think I will add this when I give the card away.
If I was to make this card again, I think that I would make the DSP panel smaller, maybe reduce it to 2 1/2". I also think that I would reduce the white spaces by stamping all the images closer or tighter together.  Further, I would rotate it and make a portrait card.
I found this card a great learning project and I am storing all of my suggested improvements in my head for a similar future project.
Built for Free Using: My Stampin Blog


Botanical Blooms (3) - Elegant Blooms

This by far is my favourite.  I think it is very elegant. I was inspired to make this card after seeing a card posted on Pinterest by Dawn Griffiths.  Again, I set out to make Dawn's card but going through the process I think that I made enough changes  to call my own. The colours are similiar, the flower layout is different and I left off the sentiment completely.
I used cream seam binding ribbon, (but it is no longer available) this could be substituted with similar coloured ribbon or a band of Very Vanilla cardstock.


Built for Free Using: My Stampin Blog